How to Choose Decorative Garden Lights That Suit Your Style
How to pick garden lighting that actually looks good after dark: the three-layer method, honest solar vs. low-voltage comparisons, lumen and color temperature targets, style-by-style layouts, installation steps, and the mistakes that make a yard look like a runway.
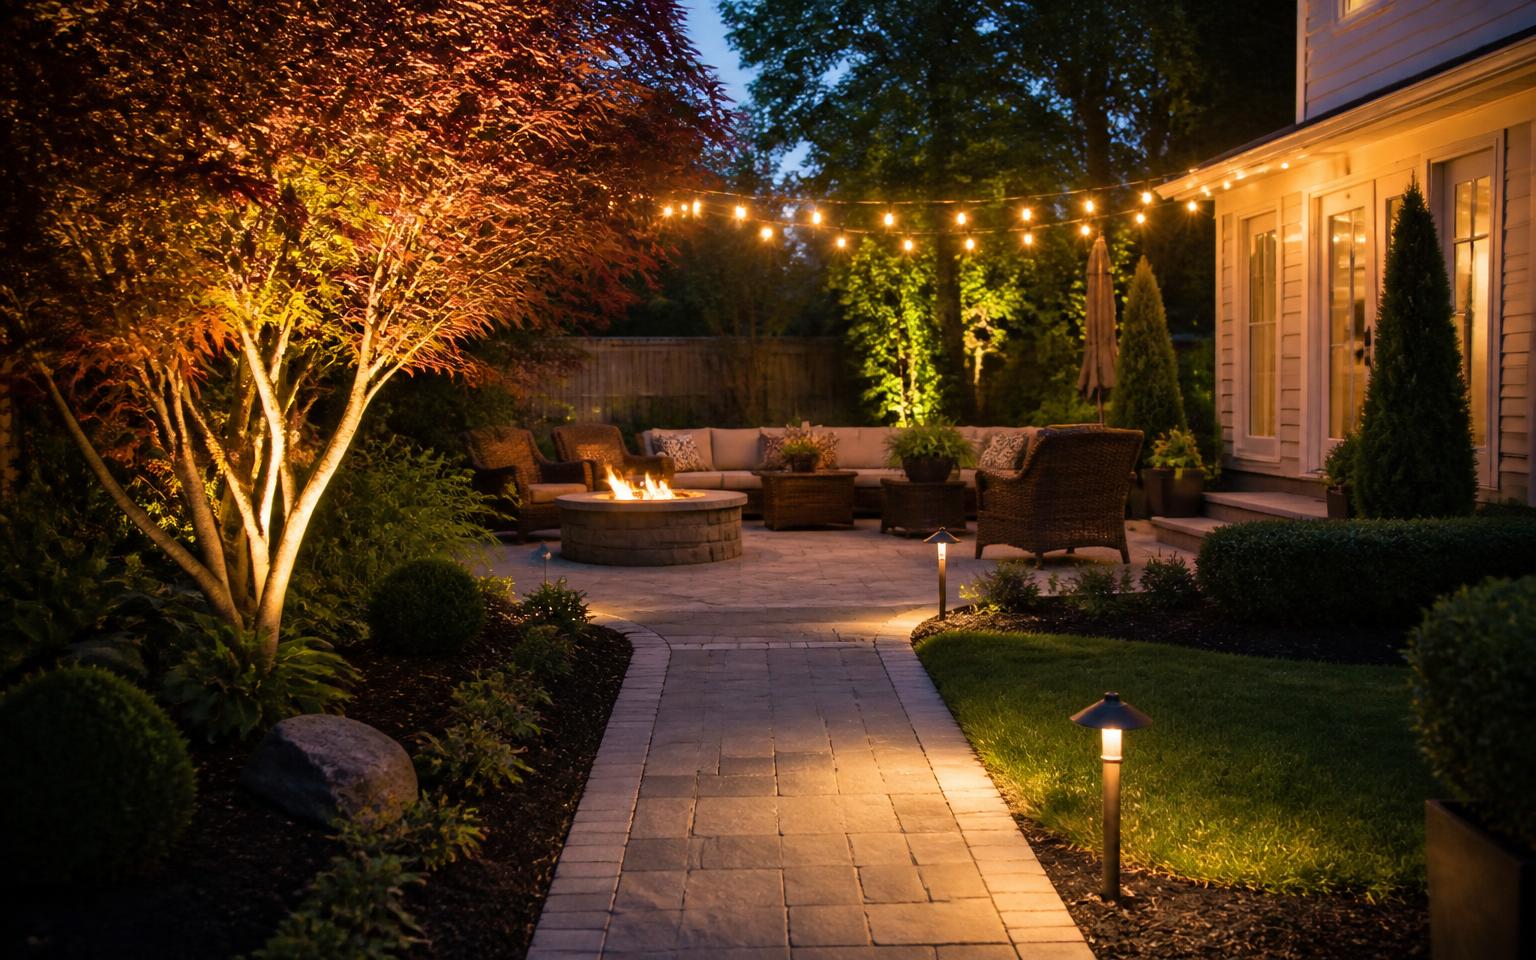
Poorly lit yards after dark usually share the same problem, and it is rarely a shortage of fixtures. It is that somebody bought a twelve-pack of solar stake lights, spaced them evenly down both sides of the walk like landing strip markers, and wondered why the yard still felt flat and a little sad at nine at night.
Good garden lighting is not about how many lights you own. It is about deciding what deserves to be seen, what should disappear into the dark, and how the eye travels between the two. Lighting is often the least expensive change that makes a large visual difference — a few hundred dollars of well-aimed fixtures can transform a yard more than a much larger spend on new plants.
This guide walks through the whole decision, in the order you actually have to make it: what you are trying to accomplish, which power system fits your property, how to read the specs that matter, which fixture types belong where, and how to match the whole thing to the style of your home. There are cost tables, a maintenance schedule, and a list of the most common mistakes. Whether you are lighting a small courtyard or a half-acre of backyard landscaping, the process is the same.
Why Decorative Garden Lighting Matters More Than People Expect
A yard is a daytime space for maybe half the hours you are home. Most Americans get back from work between five and seven, and for a good part of the year that means the outdoors is already dark or heading that way. Without lighting, everything you spent money on — the patio, the planting beds, the specimen maple — simply stops existing at dusk. Lighting is what extends the useful life of the whole landscape.
There is a practical side too. A lit path is a path people can use safely with their hands full of groceries. A lit set of steps is one nobody misjudges. Insurance adjusters will tell you that trip-and-fall claims cluster around unlit transitions: the first step down off a deck, the change in grade where a lawn meets a walkway, the last riser into a garage.
And then there is the part that is harder to put a number on. Warm, layered light makes an outdoor room feel enclosed and welcoming in a way daylight never does. It is the difference between a patio you glance at through the window and one where people actually linger after dinner. If you are already building out an outdoor living space, lighting is what determines whether it gets used three months a year or eight.
- Usable hours: lighting typically adds two to four hours of comfortable outdoor time per evening from spring through fall.
- Safety: steps, grade changes, and pool surrounds are the highest-value places to put light.
- Curb appeal: a modestly lit front elevation reads as cared-for from the street, and it photographs far better in listing photos than a dark facade.
- Security: soft, even light across a property discourages more than a single harsh floodlight, which mostly creates deep shadows to hide in.
- Wildlife and neighbors: warm, shielded, downward-aimed fixtures keep light where you want it instead of in a bedroom window next door.
Start With the Three-Layer Method, Not With a Shopping Cart
Professional designers do not think in terms of products. We think in layers, and we assign each layer a job. Once you internalize this, choosing fixtures becomes almost mechanical, because every light you consider has to answer the question: which layer is this, and does that layer already have enough?
The first layer is ambient light. This is the soft, general glow that lets you read the shape of the space — usually string lights over a patio, a wall lantern by the door, or moonlighting from a downlight mounted high in a tree. Ambient light should feel like it comes from above and from nowhere in particular.
The second layer is task light. Steps, the grill, the walk to the driveway, the seating area where somebody needs to see the cards in their hand. Task light is functional, aimed, and brighter than ambient — but not by much, because eyes adapted to darkness need far less than most people assume.
The third layer is accent light. This is the fun one and the one that separates a designed yard from a lit one: uplighting a multi-trunk tree, grazing a stone wall, silhouetting an ornamental grass against a fence. Accent light creates depth. Without it, a yard at night is a flat plane with dots on it.
A well-lit yard usually runs roughly sixty percent accent, twenty-five percent task, and fifteen percent ambient in terms of fixture count. Most homeowners buy the reverse, which is exactly why their yards look like parking lots.
| Layer | Job | Typical fixtures | Brightness guide |
|---|---|---|---|
| Ambient | Overall glow and a sense of enclosure | String lights, tree-mounted downlights, wall lanterns | Low — 30 to 100 lumens per fixture |
| Task | Safe movement and specific activities | Path lights, step lights, hardscape lights, grill lighting | Moderate — 80 to 200 lumens |
| Accent | Depth, drama, focal points | Uplights, well lights, spotlights, wall washers | Targeted — 100 to 400 lumens depending on distance |
Solar vs. Low-Voltage vs. Line Voltage: The Honest Comparison
This is the first real decision, and it drives everything after it. Here is a straightforward comparison, which is more blunt than what you will read on a product page.
Solar has improved enormously and it still has hard physical limits. A stake light with a two-inch panel collects a tiny amount of energy, and in the shaded, tree-covered yards where lighting matters most, it collects even less. Modern solar path lights typically deliver 5 to 30 lumens and run four to eight hours on a good summer charge, dropping sharply in November when the nights are longest and the sun is weakest. Batteries need replacing every one to three years. Where solar genuinely shines is a sunny, remote corner with no cable run: a mailbox, a fence line, a shed path, a rented property where you cannot dig.
Low-voltage (12-volt) is what nearly every professional installation uses, and it is often recommended for homeowners planning to stay in the house more than a couple of years. A transformer steps household current down to 12 volts, so the cable can be buried shallowly, connections are safe to handle, and the whole system is genuinely DIY-friendly. Fixtures are brighter, consistent night after night, dimmable, controllable, and available in solid brass and copper that will outlast the plastic solar units several times over.
Line voltage (120-volt) belongs to a narrow set of jobs: permanently mounted wall lanterns, post lights at the end of a driveway, and anything requiring long runs of high output. It needs a licensed electrician in most jurisdictions, conduit at code depth, and GFCI protection. There is nothing wrong with it — it just does not make sense for decorative garden lighting where 12 volts does the job for a fraction of the labor.
One nuance worth knowing: you can mix. A very common setup on the properties I design is line-voltage lanterns at the entry doors, a low-voltage system for everything in the landscape, and a couple of solar accents in the far back corner where running cable would mean trenching across a lawn for one fixture.
| Factor | Solar | Low-voltage 12V | Line voltage 120V |
|---|---|---|---|
| Typical brightness | 5–30 lumens | 50–400 lumens | 200–1,200 lumens |
| Install difficulty | Push into ground | DIY-friendly, no permit in most areas | Licensed electrician, permit usually required |
| Fixture cost each | $8–$40 | $25–$180 | $60–$400 |
| System cost, 10 fixtures | $100–$350 | $500–$1,600 DIY / $2,000–$4,500 installed | $2,500–$7,000 installed |
| Running cost per year | $0 | $8–$25 for a typical LED system | $25–$70 |
| Reliability in shade or winter | Poor | Unaffected | Unaffected |
| Expected fixture life | 2–5 years | 10–25 years (brass/copper) | 15–30 years |
| Dimming and smart control | Rare | Widely supported | Widely supported |
| Best use | Remote sunny spots, rentals | Whole-yard decorative lighting | Entry lanterns, driveway posts |
The Four LED Specs That Actually Change How Your Yard Looks
Product listings bury the useful numbers under marketing language. There are only four specifications you need to read, and getting them right matters more than the brand on the box.
Lumens, not watts. Watts measure consumption; lumens measure light. An LED path light at 100 lumens is plenty for a walkway. A 300-lumen path light — and they sell them — will blind anyone walking toward it and wash out everything around it. For uplighting a 20-foot tree, 200 to 400 lumens is right; for a small ornamental under 10 feet, 100 lumens is often too much. Energy.gov: Lumens and Lighting Facts
Color temperature, measured in Kelvin, is the single spec people get wrong most often. Warm white at 2700K is the standard for residential landscapes: it flatters brick, wood, stone, and skin tones, and it reads as inviting. 3000K is a touch crisper and works well on gray stone, modern architecture, and cool-toned siding. Anything at 4000K or above looks like a commercial parking lot and makes green foliage look gray. The exception is lighting a blue spruce or silver-foliage plant, where 4000K can be used deliberately — sparingly.
Color rendering index (CRI) describes how truthfully a light shows color. Below CRI 80, red brick turns brown and green leaves go muddy. Look for CRI 80 as a floor and CRI 90+ where you are lighting planting beds or a stone facade you actually want to show off.
Beam angle controls the shape of the light. A narrow 15-degree spot is for tall, columnar trees and architectural details. A 35 to 40-degree beam is the everyday workhorse for shrubs and small trees. A 60-degree flood is for wall washing and wide canopies. Buying fixtures with interchangeable lenses is a small upcharge that pays for itself the first time a plant grows.
| Application | Lumens | Color temp | Beam angle |
|---|---|---|---|
| Path and walkway lights | 80–120 | 2700K | Full-cut-off downward |
| Step and riser lights | 30–60 | 2700K | Downward wash |
| Small ornamental tree uplight | 100–200 | 2700K | 35–40° |
| Mature shade tree uplight | 250–400 | 2700K–3000K | 15–25° |
| Wall wash / stone grazing | 150–300 | 2700K | 60° |
| Moonlighting downlight in tree | 100–200 | 3000K | 60° |
| Cafe string lights | 20–40 per bulb | 2200K–2700K | Omnidirectional |
| Water feature or pool accent | 100–200 | 2700K–3000K | 40° |
Pathway Lighting: Where Almost Everyone Overdoes It
Path lighting exists to show you the edge of the walkway, not to illuminate the walkway itself. That distinction is the whole trick. You are placing small pools of light that the eye connects into a line, the way runway lights work — except a runway wants brute visibility and your front walk wants rhythm.
Space fixtures eight to twelve feet apart, staggered on alternating sides rather than paired directly across from each other. Paired fixtures create that gate-and-airstrip effect that instantly reads as builder-grade. Staggering makes the same number of lights feel intentional and covers the walk more evenly.
Set them back six to twelve inches from the pavement edge, far enough that a mower deck and a snow shovel do not find them, close enough that the light lands on the surface people are actually walking on. Height matters too: a fixture whose shade sits 18 to 24 inches above grade throws a usable circle roughly three feet wide. Taller than about 30 inches and the light spreads thin and the fixture starts glaring into sightlines.
Always choose a full-cutoff or hat-style shade that hides the lamp completely. If you can see the bulb from a standing position, the fixture is creating glare, and glare is what makes the rest of the yard look darker than it is. This applies just as much to a stone-lined garden path through planting beds as it does to a formal front walk.
- Space 8–12 ft apart, staggered — not in matched pairs.
- Set back 6–12 inches from the paved edge to survive mowers and shovels.
- Fixture height 18–24 inches for a clean three-foot pool of light.
- Full-cutoff shade so the lamp itself is never visible at eye level.
- Light the turns and grade changes first, then fill in the straight runs.
- Skip a fixture wherever spill from an adjacent uplight already does the job.
Accent Lighting and Uplighting: The Layer That Creates Depth
If you only add one type of fixture beyond path lights, make it uplighting. Nothing changes a yard at night faster. A single well-aimed uplight on a mature tree gives the space a ceiling, a background, and a sense of scale that no amount of ground-level lighting can produce.
For a tree with an interesting trunk — a river birch, a crape myrtle, a Japanese maple — place the fixture 12 to 24 inches from the base and aim it up through the branch structure. For a broad canopy, back the fixture out to three or four feet and use a wider beam so the light reaches the outer leaves. Two fixtures on opposite sides of a large tree look better than one, because a single source flattens the canopy into a shape.
Grazing is the technique for texture. Set a fixture within a few inches of a stone wall, a stucco chimney, or a board-formed concrete surface and aim it straight up. The shallow angle exaggerates every ridge and joint. It is spectacular on real masonry and unforgiving on cheap siding, so test before you commit.
Silhouetting reverses the idea: put the light behind a plant with a strong outline — an agave, a Japanese maple in winter, a tall grass — and wash the fence or wall behind it. You get a black graphic shape against a glowing surface. It costs one fixture and looks like a designer did it.
And then moonlighting, my personal favorite and the most underused technique in residential lighting. Mount a shielded downlight 15 to 25 feet up in a mature tree, aim it down through the branches, and the light filters through leaves onto the ground in soft dappled patterns. Nobody can tell where it comes from. It feels like a full moon on a clear night, and it makes a patio feel enormous.
| Technique | Effect | Best subjects | Fixture placement |
|---|---|---|---|
| Uplighting | Height, drama, a visual ceiling | Mature trees, columns, specimen shrubs | 1–4 ft from base, aimed up |
| Grazing | Exaggerated surface texture | Stone walls, stucco, brick chimneys | 3–12 in from the surface |
| Silhouetting | Bold dark shapes against light | Grasses, agave, sculptural branching | Behind the plant, washing the backdrop |
| Shadowing | Soft plant shadows on a wall | Ferns, small ornamentals | In front of plant, low, aimed at the wall |
| Moonlighting | Natural dappled light from above | Patios, lawns, seating areas | 15–25 ft up in a tree, shielded, aimed down |
| Wall washing | Even, calm background glow | Fences, garage walls, privacy hedges | 2–4 ft out, wide beam |
String Lights, Lanterns, and the Decorative Fixtures People Notice
Everything above is about light you feel rather than fixtures you look at. Decorative fixtures are the opposite: they are visible by design, and they set the personality of the space.
Commercial-grade cafe string lights are the best money-to-atmosphere ratio in outdoor lighting, full stop. Look for a heavy-duty rubberized cord rated for outdoor use, shatterproof lens bulbs, and a warm 2200K to 2700K filament-style LED. Hang them nine to eleven feet above the patio surface, high enough for clearance and low enough to feel like a ceiling. Run them in straight lines or a gentle zigzag with a slight catenary sag — perfectly taut strings look tense and tend to fail at the connectors. Use eye hooks in solid structure and a length of aircraft cable to carry the tension rather than the light cord itself. Over a pergola or covered patio this is a two-hour project that changes everything.
Wall lanterns flank doors and garage bays and are the fixtures your guests actually see up close, so material quality shows. Solid brass and copper develop a patina and last decades; powder-coated aluminum is the reasonable middle; anything described only as metal will usually rust at the seams within a few seasons in a wet climate. Size them at roughly one quarter to one third the height of the door for a single lantern, and use frosted or seeded glass to hide the lamp.
Post lanterns, hanging pendants over an outdoor dining table, lit bollards along a modern walk, portable rechargeable table lamps for the dinner table, flame-effect LED lanterns for a fire pit seating circle — these all belong to the same category. My rule of thumb: pick one decorative family and repeat it. Three matching lanterns look designed. Three different styles look like three separate shopping trips.
- String lights: commercial-grade cord, shatterproof bulbs, 2200–2700K, hung 9–11 ft high with a slight sag.
- Support strings with aircraft cable and turnbuckles; never let the cord carry the load.
- Wall lanterns: 1/4 to 1/3 the door height, frosted glass, brass or copper if the budget allows.
- Repeat one decorative family across the property instead of mixing styles.
- Rechargeable portable lamps are the flexible answer for tables and side tables with no power nearby.
- Avoid color-changing bulbs as your main source — keep RGB on a separate, occasional circuit.
Smart Controls, Timers, and Zoning
Control is what turns a collection of fixtures into a system, and it is where the last decade of product development has actually delivered something useful.
At minimum, put everything on an astronomical timer. Unlike a basic clock timer, an astro timer knows your latitude and adjusts to real sunset every day, so the lights come on with dusk in June and in December without you touching anything. Nearly every low-voltage transformer sold today includes one, and it is the difference between a system that runs itself and one you resent.
Photocells are a simpler alternative — they switch on when ambient light drops. They work, but they can be affected by headlights, snow glare, or their own light reflecting off a nearby wall. They are often used as a backup rather than a primary controller.
The next step up is zoning: separate circuits for the front path, the accent lighting, and the patio. Zones matter because you rarely want everything on at once. A common program has path and step lights running until midnight for safety, accent lighting shutting off at 11 p.m., and patio strings on manual so they only run when people are outside.
True smart systems — app-controlled transformers, Wi-Fi or Bluetooth mesh fixtures, integration with Alexa, Google Home, or HomeKit — add dimming, scenes, and scheduling per zone. Dimming is the sleeper feature. Being able to run accent lighting at forty percent on an ordinary Tuesday and full output when you have company is both more pleasant and easier on the fixtures.
One caution from experience: prefer systems where the schedule lives in the transformer or a local hub rather than exclusively in the cloud. Internet outages should not leave your walkway dark.
| Control type | What it does | Typical cost | Good fit for |
|---|---|---|---|
| Manual switch | On and off, by hand | $0–$20 | String lights and occasional-use fixtures |
| Photocell | Turns on at dark, off at dawn | $10–$30 | A single fixture or small system |
| Astronomical timer | Tracks real sunset year-round | Built into most transformers | Nearly every low-voltage system |
| Zoned transformer | Independent schedules per circuit | $150–$450 | Yards with distinct areas |
| App-controlled smart system | Dimming, scenes, per-fixture control | $300–$900 plus fixtures | Larger properties and tech-friendly owners |
| Motion sensor add-on | Boosts output when someone approaches | $25–$70 | Side yards, driveways, service doors |
Choosing Decorative Garden Lights by Style
Style is where most guides get vague, so here is the specific version. Fixture finish, lamp color, and technique should follow the architecture of the house and the character of the planting. When they do, the lighting looks like it was always there.
Modern and contemporary yards want restraint: minimal profiles, matte black or dark bronze, hidden sources, hard-edged shapes. Use in-grade well lights so nothing interrupts the plane of the walk, linear step lights recessed into risers, and 3000K to bring out the gray and white tones common in modern hardscape. Fewer fixtures, cleaner geometry.
Traditional and colonial homes look best with visible, familiar shapes: shaded path lanterns in bronze or antique brass, symmetrical wall lanterns flanking the front door, warm 2700K light, and uplighting on foundation shrubs. Symmetry is a feature here rather than a mistake.
Cottage and English gardens should feel unplanned. Copper fixtures that patina to a soft green, low mushroom-cap path lights half-hidden in perennials, string lights strung casually over a seating nook, and lots of small pools of light instead of a few big ones.
Southwestern and desert landscapes are about shadow and form. Silhouette the agaves and yuccas, graze the stucco, keep the color warm, and use very few fixtures — desert plants are so sculptural that overlighting kills the effect.
Coastal properties have one dominant constraint: salt. Marine-grade solid brass, copper, or 316 stainless is the only thing that survives long-term; powder-coated aluminum will bubble and pit within a few seasons within a mile of the ocean. Keep the palette light and the light itself soft.
Farmhouse and rustic yards suit galvanized and matte black finishes, oversized string lights, barn-style wall sconces, and warm 2200K bulbs. It is the one style where slightly visible bulbs are part of the charm.
| Style | Finish | Color temp | Signature technique |
|---|---|---|---|
| Modern / contemporary | Matte black, dark bronze | 3000K | In-grade well lights and recessed step lights |
| Traditional / colonial | Antique brass, oil-rubbed bronze | 2700K | Symmetrical lanterns plus shrub uplighting |
| Cottage / English | Natural copper, verdigris | 2700K | Low path lights tucked in perennials, casual strings |
| Southwestern / desert | Bronze, weathered steel | 2700K | Silhouetting sculptural plants, stucco grazing |
| Coastal | Marine brass, 316 stainless | 2700K | Soft wall washing, minimal glare toward the water |
| Farmhouse / rustic | Galvanized, matte black | 2200–2700K | Oversized cafe strings and barn sconces |
| Japanese / Zen | Dark bronze, natural stone | 2700K | Moonlighting and low lantern accents |
| Mediterranean | Aged brass, terracotta | 2700K | Uplighting olive and cypress forms |
Safety, Code, and the Rules Worth Knowing Before You Dig
Low-voltage lighting is genuinely safe to work with, but a few rules are non-negotiable and a couple of them are legal requirements everywhere in the United States.
Call 811 before you dig. It is free, it is federally promoted, and in most states it is required by law. Two to three business days ahead of your project, utilities come out and mark buried gas, electric, water, and communication lines. Even a shallow six-inch trench for landscape cable can find a shallowly buried gas service or an irrigation main, and hitting either one turns a Saturday project into an emergency. 811: Call Before You Dig
Every outdoor receptacle must be GFCI protected, and the transformer must plug into one. Use an in-use, weatherproof outlet cover — the bubble-style ones that close over a plugged-in cord — rather than the flip-lid type. Any 120-volt work beyond plugging in a transformer should go to a licensed electrician.
Size the transformer with headroom. Add up the wattage of all your fixtures and choose a transformer rated at least 20 to 30 percent above that total, both for safety and so you can add fixtures later without replacing the unit. Watch voltage drop on long runs: with 12-gauge cable, a run past 100 feet with a heavy load will dim the far fixtures noticeably. The fix is heavier cable, a hub-and-spoke layout, or a multi-tap transformer.
Around water there are stricter rules. Fixtures near pools and spas fall under specific National Electrical Code requirements for clearances, bonding, and listed equipment. If you are lighting a pool surround, that is a conversation with a licensed electrician, not a weekend project — see our pool deck guide for how the deck itself and its electrical work interact.
Finally, check local rules. Many HOAs restrict fixture height, brightness, or color, and a growing number of municipalities have dark-sky ordinances requiring shielded, downward-facing fixtures under 3000K. If you are already navigating an architectural review committee, the same approach that works for HOA front yard landscaping works for lighting: submit a simple plan, get it in writing, then install.
- Call 811 at least two business days before any digging — free and legally required in most states.
- Transformer must plug into a GFCI-protected receptacle with an in-use weatherproof cover.
- Size the transformer 20–30% above your total fixture wattage.
- Bury 12-gauge low-voltage cable 6 inches deep, or run it under mulch along bed edges.
- Use waterproof gel-filled or heat-shrink connectors, never twist-on wire nuts outdoors.
- Anything within 10 feet of a pool or spa is licensed-electrician territory.
- Verify HOA and dark-sky rules on shielding, height, and color temperature first.
Step-by-Step: Installing a Low-Voltage System in a Weekend
A ten to fifteen fixture low-voltage system is one of the most satisfying DIY projects in the yard. Here is a standard sequence for a successful installation.
The most important step is the one people skip: the night test. Before you bury a single foot of cable, lay everything out on top of the ground and live with it for a night or two. Move fixtures. Change aiming. Aiming is not something you can judge in daylight, and once the cable is buried, changes cost real effort.
- 1. Sketch the yard and mark focal points, paths, steps, and seating first. Decide the layer for every fixture before you buy anything.
- 2. Call 811 and wait for the utility markings.
- 3. Total your fixture wattage and pick a transformer with 20–30% headroom and an astronomical timer.
- 4. Lay fixtures and cable on the ground in the planned positions, connect temporarily, and test at night. Adjust for two evenings.
- 5. Cut a shallow trench with a flat spade — a slit six inches deep is enough — or tuck the cable under mulch along bed edges.
- 6. Make connections with waterproof gel-filled connectors. Leave a small service loop of extra cable at each fixture for future moves.
- 7. Mount the transformer at least 12 inches above grade near a GFCI outlet, on a wall or post, not on the ground.
- 8. Backfill, tamp the soil, refresh the mulch, and photograph the cable runs before they disappear so future-you knows where to avoid a shovel.
- 9. Set the timer, aim each fixture one last time after dark, and dim anything that draws too much attention.
Maintenance: Twenty Minutes a Season Keeps It Looking New
Lighting fails slowly and quietly. A lens fogs, a shrub grows in front of a fixture, a stake gets bumped by a mower, and six months later the yard looks worse without anyone knowing why. A short seasonal routine prevents nearly all of it.
The most common issue by far is plant growth. Landscape plants get bigger every year, and a fixture perfectly aimed at a young shrub is buried inside it by year three. Every spring, walk the system and re-aim.
The second most common issue is corrosion at connections, which is why gel-filled waterproof connectors matter so much. If a fixture goes dark and the lamp is fine, the connector is the first suspect.
Add this walk-through to your regular seasonal home maintenance checklist and it will never slip.
| Season | Tasks | Time needed |
|---|---|---|
| Spring | Re-aim every fixture, clean lenses, trim plants blocking light, check for winter frost heave | 30–45 min |
| Summer | Check timer against actual sunset, adjust for grown foliage, inspect string light connectors | 15 min |
| Fall | Clear leaves from in-grade fixtures, verify drainage around well lights, re-aim after pruning | 20–30 min |
| Winter | Keep fixtures clear of snow piles, avoid rock salt near brass and copper, check for shovel damage | 10–15 min |
| Every 2–3 years | Replace solar batteries, tighten stakes, test transformer output, replace fogged lenses | 1 hour |
Seasonal and Holiday Lighting Without Undoing Your Design
Decorative lighting and holiday lighting are different jobs, and the mistake is letting the second one erase the first. Keep them on separate circuits and separate controls so your permanent system keeps doing its work while the seasonal layer comes and goes.
For fall, warm amber accents in planting beds and lanterns along the walk complement the season without looking like a costume. Uplighting a maple in October works well — the foliage acts like a stained-glass ceiling.
For winter holidays, add a dedicated outdoor-rated outlet with its own timer rather than daisy-chaining extension cords through the permanent system. Use clips instead of staples on gutters and trim, and keep total load per circuit well under fifteen amps. When the season ends, coil and label everything and store it dry — most string-light failures happen in the box, not on the house.
In spring and summer, portable rechargeable lanterns, solar accents along a vegetable garden path, and a few extra string lights over a dining area are usually all the seasonal change a yard needs. If you are already doing a fall garden cleanup or winterizing the yard, that is the natural moment to reset the lighting too.
Budget Planning: What Garden Lighting Actually Costs in 2026
Prices vary by region and by how much of the work you do yourself, but these ranges reflect typical retail pricing for quality products and common installation costs.
The most useful budgeting approach is to phase the project. Buy a transformer with capacity for twice what you install initially, run cable to the far corners of the yard while the trench is open, and cap the spare leads. Adding fixtures later becomes a fifteen-minute job instead of another excavation. A common regret is buying a transformer sized exactly to the first ten fixtures.
Spend unevenly. Put the money into brass or copper fixtures for the six or eight positions closest to where people walk and sit, and use budget fixtures for background wall washing where nobody sees the housing. A mixed system that concentrates quality where it is visible outperforms an all-mid-range one at the same price.
| Project scope | DIY cost (est) | Professional install (est) | What you get |
|---|---|---|---|
| Starter accent kit | $150–$400 | — | Transformer plus 4–6 low-voltage fixtures |
| Front walk and entry | $400–$900 | $1,200–$2,500 | 8–12 path and accent fixtures, timer |
| Patio ambiance | $120–$400 | $500–$1,200 | Cafe strings, cable supports, 2 wall lanterns |
| Whole-yard system | $1,200–$3,000 | $4,000–$9,000 | 20–30 fixtures, zoned transformer, full design |
| Smart upgrade | $300–$800 | $900–$2,000 | App control, dimming, per-zone scheduling |
| Annual operating cost | $8–$30 | $8–$30 | LED system running ~6 hours nightly |
Nine Common Garden Lighting Mistakes
Most problem yards share a handful of the same errors. None of them are expensive to avoid, and all of them are expensive to fix after the cable is buried.
- Too much light. Eyes adapt to darkness. A yard lit to daytime levels looks harsh and erases every shadow that gives it depth.
- Cool white bulbs. 4000K and up turns warm brick gray and green foliage sickly. Stay at 2700K–3000K.
- Runway path lighting. Evenly spaced pairs down both sides of a walk is the single clearest sign of an unplanned system.
- Visible bulbs. Any lamp you can see from a standing position creates glare and makes everything around it look darker.
- Ignoring plant growth. Fixtures aimed at three-gallon shrubs disappear inside them within three seasons.
- Undersized transformer. No headroom means no expansion and a shortened transformer life.
- Cheap connectors. Twist-on wire nuts outdoors corrode within a year. Use gel-filled waterproof connectors.
- Lighting everything. Darkness is a design element. Contrast is what makes the lit areas beautiful.
- Skipping the night test. Aiming can only be judged after dark, and only before the cable is buried.
A Sensible Starting Plan for Most Homeowners
For a first budget of around a thousand dollars, a practical order of priorities looks like this.
Start with two uplights on the best tree in the front yard and one wall wash on the most attractive facade material. That is three fixtures, and it will do more for the property from the street than anything else you can buy. Next, add path lighting only where the walk turns or changes grade — usually three or four fixtures, not ten. Then step lights on every riser, because that is the safety layer and it never looks like decoration.
With whatever is left, put cafe string lights over the patio and a pair of quality lanterns at the front door. At that point you have all three layers working, a system that photographs well, and a transformer with room to grow.
Buy solid brass for anything at ground level in a bed, where soil moisture and string trimmers do the most damage. Buy interchangeable-lens fixtures so you can change beam angles as plants mature. And buy from a line that will still exist in five years, because matching a discontinued fixture is a genuinely annoying problem.
One last thing that costs nothing: turn some lights off. The most refined yards are usually the ones where roughly two thirds of the property stays dark and the third that is lit is chosen with intent.
- Priority 1: two uplights on the best tree, one facade wash.
- Priority 2: step lights on every riser and grade change.
- Priority 3: path lights at turns and transitions only.
- Priority 4: cafe strings over the primary seating area.
- Priority 5: two quality lanterns at the entry door.
- Then stop, live with it for a month, and add only what you actually miss.
Frequently Asked Questions
How many garden lights do I actually need?
Fewer than most people buy. A typical quarter-acre suburban lot looks well lit with 12 to 20 fixtures total, weighted toward accent lighting rather than path lights. A useful test: if you can identify individual light sources from the street rather than seeing the effect they create, you have too many or they are aimed wrong. Start with six to eight, live with them for a few weeks, and add only where you notice a gap.
Are solar garden lights bright enough to be worth it?
For accents, edges, and remote spots with genuinely full sun, yes. For anything you rely on — steps, main walkways, safety lighting — no. Solar path lights typically produce 5 to 30 lumens compared with 80 to 120 from a low-voltage fixture, and their output drops sharply in shade and in winter when nights are longest. The honest use case is a sunny fence line or shed path where running cable is not practical.
What color temperature is best for outdoor garden lights?
2700K warm white for almost everything residential. It flatters brick, wood, stone, and green foliage, and it reads as welcoming rather than institutional. Use 3000K on modern architecture, gray stone, and cool-toned siding where a slightly crisper light looks intentional. Avoid 4000K and above in gardens — it makes plants look gray and gives the yard a commercial parking lot feel.
Do I need an electrician to install landscape lighting?
Not for a low-voltage 12-volt system. The transformer plugs into an existing GFCI outdoor receptacle and everything past it is safe to handle, which is why low-voltage is the standard for DIY. You do need an electrician to add a new outdoor circuit, to install 120-volt post or wall fixtures, and for any lighting near a pool or spa, where the National Electrical Code has specific bonding and clearance requirements.
How deep should low-voltage landscape wire be buried?
Six inches is the general guideline and is sufficient in planting beds and lawns. Under mulch along a bed edge, three to four inches is common and acceptable. The depth is about protecting the cable from shovels and aerators rather than electrical safety. Photograph your cable runs before backfilling — that record is worth more than the trenching itself when you plant a shrub three years later.
Why do my path lights look like an airport runway?
Because they are evenly spaced in matched pairs on both sides of the walk, and probably too bright. Stagger them on alternating sides, space them eight to twelve feet apart, keep output around 100 lumens, and skip fixtures on straight runs where a nearby uplight already spills onto the path. Lighting only the turns and grade changes almost always looks better than lighting the whole walk.
Can I mix solar and low-voltage lights in the same yard?
Yes, and plenty of good yards do. The thing to watch is consistency of appearance, not the power source. Match color temperature — 2700K solar with 2700K low-voltage — and pick finishes from the same family. Problems come from mixing a cool-white solar set with warm low-voltage fixtures, which makes both look wrong.
How much does it typically cost to run garden lights?
Very little with LEDs. A typical 15-fixture low-voltage system uses a small amount of electricity, often costing less than $25 a year at typical U.S. residential rates. That is one of the reasons LED replaced halogen so completely. [Energy.gov: Lighting Systems](https://www.energy.gov/energysaver/lighting-systems)
Will landscape lighting bother my neighbors or attract bugs?
Both are manageable with fixture choice. Use full-cutoff shades and aim downward to keep light off neighboring windows; that also satisfies most dark-sky ordinances. For insects, warmer color temperatures at 2700K and below attract fewer flying insects than cool white. [International Dark-Sky Association: Outdoor Lighting Basics](https://www.darksky.org/our-work/lighting/lighting-for-citizens/lighting-basics/)
What is moonlighting and is it hard to do?
Moonlighting is mounting a shielded downlight high in a mature tree, typically 15 to 25 feet up, and aiming it down through the branches so light filters onto the ground in soft dappled patterns. It is the most natural-looking technique in landscape lighting. Installation is the hard part — it requires safe ladder or arborist access and mounting hardware that will not girdle the tree as it grows. If you have a suitable tree, it is worth paying a professional for this one fixture.
How long do LED landscape lights last?
Quality integrated LED fixtures are typically rated for 40,000 to 50,000 hours, which at six hours a night is roughly 20 years. In practice the housing usually fails before the LED does: plastic fixtures crack and fade in five to seven years, powder-coated aluminum lasts eight to fifteen, and solid brass or copper commonly lasts 20 to 30 years and just develops a patina. Buy the housing, not the bulb.
Should I hire a professional or do it myself?
Do it yourself if you are installing a low-voltage system of roughly 15 fixtures or fewer on a straightforward lot. The work is trenching, connectors, and patience, and the design principles in this guide cover most of the decisions. Hire a professional for large properties, complex trees, anything requiring 120-volt work, pool areas, or when you want a designed result rather than an installed one — a good designer earns their fee in aiming and restraint more than in labor.
Does outdoor lighting add value when selling a home?
It rarely appears as a separate line on an appraisal, but it affects how a property presents, which affects offers. Well-lit exteriors photograph better in listing photos, and evening showings in fall and winter are common in much of the country. Lighting also makes outdoor living areas read as usable space. It belongs in the same category as the upgrades covered in our guide to [backyard features that raise home value](/articles/backyard-landscaping-ideas-increase-home-value).
What is the best time of year to install garden lighting?
Early spring and early fall are ideal. The ground is workable, plants are visible enough to plan around but not at full size, and you get long evenings to test aiming. Fall has a specific advantage: with deciduous foliage thinning you can see branch structure clearly, which makes tree uplighting easier to plan. Avoid mid-summer if you can — you will be trenching in heat and testing at ten at night.
Conclusion
Choosing decorative garden lights comes down to a handful of decisions made in the right order: pick your layers before your products, choose low-voltage unless you have a specific reason not to, stay at 2700K, hide the source, and light less than you think you should. Do those five things and a modest budget will produce a yard that looks professionally designed after dark — because the principles are the same ones professionals use. Start with three fixtures on the best feature you own, test them at night before anything gets buried, and build from there one season at a time. When you are ready to keep going, our outdoor living space guide covers zoning and shade, the small backyard design ideas piece is built for tighter lots, and the landscaping category collects the rest of our outdoor projects.
About the author
Outdoor Living & Landscaping Contributor
Adilson covers topics related to gardens and outdoor spaces: planting plans, patios and pathways, drainage and slope, and the advantages and disadvantages of lawn alternatives.
More from Adilson VieiraPublished · Updated
Related articles
A Homeowner Guide to Creating an Outdoor Living Space
A design-forward, homeowner-friendly playbook for turning a plain yard into an outdoor living space you actually use every week.
Pool Deck Guide: Choosing the Right Material, Size, and Layout for Your Backyard
What homeowners need to decide on a pool deck: material comparisons, sizing and layout, surface heat and traction, drainage, installation quality, upkeep by material, and the factors that drive installed cost.
10 Practical Backyard Landscaping Ideas That Can Help Home Value
Ten realistic backyard landscaping projects that can improve curb appeal and how a home presents to buyers, ranked by cost and effort.
Fresh home & garden ideas, every Sunday.
Join American homeowners getting practical home & garden advice on gardening, landscaping, and DIY. Free, no spam, unsubscribe anytime.